



Your reloading bench is the foundation of your entire reloading operation. While most handloaders simply bolt down equipment to their benches, there are more flexible options, including the Ultimate Reloader Bench System.
Your reloading bench is the foundation of your entire reloading operation. While most handloaders simply bolt down equipment to their benches, there are more flexible options, including the Ultimate Reloader Bench System. Let’s explore the system, consider different configurations, and look at how you can use the system to build your own reloading bench or modify an existing one to suit your requirements.
The Ultimate Reloader Bench System arose from my need to show a wide variety of reloading equipment on camera and sometimes change out gear and setups on a daily basis. So simply bolting down reloading presses was just not an option for me. After realizing this I researched different options for mounting gear to workbenches and found many cool ideas from the woodworking community. One of these ideas involved embedding T-tracks into woodworking benches.
After mulling all this over I thought: “That could work great for reloading benches.” I ordered some T-tracks and got to work adapting this woodworking concept to my reloading bench. I’ve used the resultant design since 2009 and have incorporated it into many of the benches that we keep at multiple locations. This bench system is not just for industry professionals—it’s also great for everyday reloaders, especially those with limited space where tools (including non-reloading tools) need to be easy to swap out, set up, and tear down.
Two T-slot tracks installed on the top surface of a sturdy reloading bench, spaced 8 inches apart center to center.
The Ultimate Reloader Bench System incorporates two T-slot tracks installed on the top surface of a sturdy reloading bench, spaced 8 inches apart center to center. The 3/8-inch bolts slid into the T-tracks with threaded ends pointed upward provide a solid mounting interface for a variety of tools. This also enables easy and flexible side-to-side positioning for each component. This system can be added to your existing bench or form part of a dedicated reloading bench build.
A variety of extruded aluminum T-slot tracks are available today. The most popular types are either 1/4-inch with 20 bolts (smaller, light-duty T-tracks) or 3/8-inch with 16 bolts (heavy-duty T-tracks). At Ultimate Reloader, we use only the heavy-duty type.
Most aluminum T-tracks are anodized. This makes them more durable and scratch-resistant and reduces friction when you’re sliding bolts from side to side in the T-track. One possible modification to the off-the-shelf aluminum T-tracks you may want to consider is adding additional mounting holes and enlarging the countersunk screw-mounting recessed areas to accommodate larger screws. At Ultimate Reloader, we like to use at least #10 wood screws to mount the T-tracks to the benchtops. This may be overkill but seems a lot more solid than the setup that most T-tracks come with from the factory.
You can use your existing bench, build a new bench, or buy an off-the-shelf bench. Any of these types can be built or modified to incorporate the Ultimate Reloader Bench System. Here are a few options.
Wall-Mounted or Freestanding Bench
I have built multiple reloading benches with 2x4 dimensional lumber frames, 4x4 post legs, metal brackets for corners, and tabletops composed of 2x6 lumber and plywood. It is important that your T-tracks are mounted over 2x4 (or larger) frame members as pictured (8x2-foot benchtop shown). The T-tracks need a substantial frame support to screw into. I suggest using 3-inch screws so that your T-tracks don’t flex upward or pull out of the benchtop.
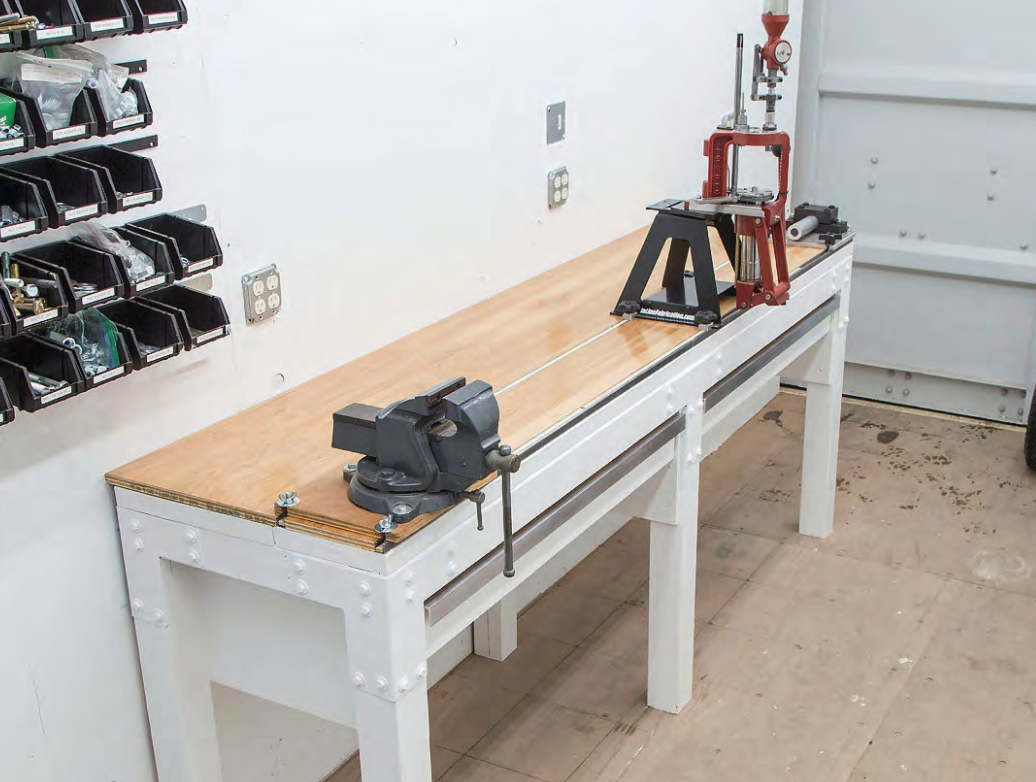
Note: For a comfortable “standing” reloading bench setup, I typically have my reloading benchtop about 38 inches above the floor surface. But you can build yours at any height you like.
If you’re building a freestanding bench from scratch, there are multiple options on the market for corner brackets and related hardware that can make for a sturdy bench without requiring a major woodworking project. These kits and parts can be used with dimensional lumber from your local hardware store.
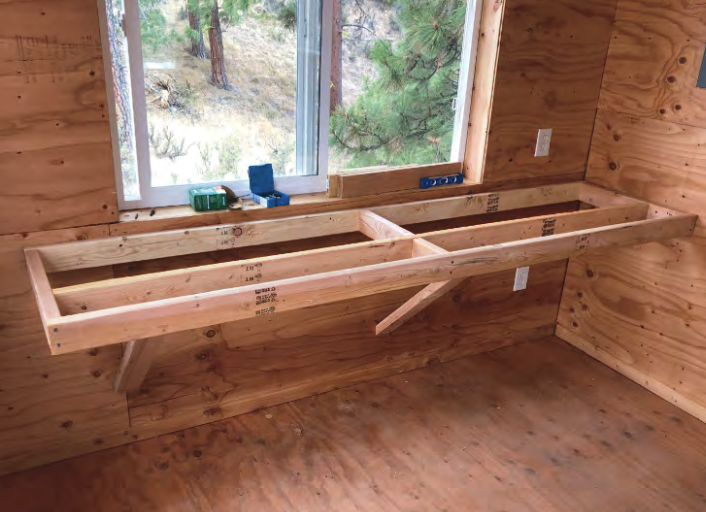
To build a bench like the examples shown, I recommend these steps for building the benchtop:
Plan your dimensions. I suggest a benchtop at least 24 inches deep and a length of 4, 6, or better yet 8 feet if you have the room. It’s a good idea to research the T-track that you intend to buy and plan for multiple lengths of T-track for your bench’s width. Bench lengths of 4 or 8 feet will make the most of 8-foot dimensional lumber (you either use the full length or cut it in half). Be sure to keep in mind that stud-length 2x4 lumber is not a full 8 feet long (it’s usually 92 5/8 inches or thereabouts).
Make a drawing outlining how the dimensional lumber will fit together. Check your math to ensure you fully understand the exact dimensions to which you need to cut each piece. Your drawing will help you follow the old adage “measure twice, cut once.”
Make the appropriate cuts. Lay out the dimensional lumber in the same orientation that you’ll end up screwing or nailing it together. Double-check that everything lines up properly.
Screw together the outer frame (bounding rectangle). Make sure that the corners square up at 90 degrees and that the outer dimensions are correct.
Screw in the rear T-track support 2x4 from the sides on both ends of the frame. Double-check your dimensions are correct. The center of this mid-span 2x4 should be 8 inches from the line where the center of the front T-track will be mounted. If your T-track is 7/8 inch wide, for example, you’ll want the center of your mid-span 2x4 to measure 8 inches minus half of 7/8 inch, which is 7 9/16 inches from the front edge of the frame/bench.
Use screws to install 2x4 members between the center-span 2x4 and the front and rear frame members. At the center-span 2x4, you’ll need to toenail the screws into the center-span member (angle screws in from the top and bottom). The benchtop frame is now complete. You can add additional transverse 2x4 supports if you want a stiffer benchtop.
Not covered here: At this point you should mount the benchtop to legs or wall supports. Doing this now will be easier than if you try to do this after the top boards, T-tracks, and plywood panels are in place.
Lay down dimensional lumber on top of the bench and determine if you’ll need to rip down one of the boards in order to land at the width you decided on for your bench.
If necessary, rip down one of the benchtop boards.
Screw down the benchtop boards. Make sure to screw the boards down to each of the frame members underneath. A regular interval of one screw every 12 to 16 inches should be adequate.
Optional: Drill additional T-track mounting holes (and countersink them) in the T-tracks and enlarge them for #10 screws if you like.
Use a table saw or circular saw to rip plywood tabletop finishing panels to width and length. For an 8-inch separation, use the following formula to calculate the width of the plywood between the T-tracks: Width = 8 inches minus the single T-track width. For 7/8-inch-wide T-track, that would be 8 inches minus 7/8 inch = 7 1/8 inches. The other plywood panel should measure the width of the tabletop, minus two T-track widths, minus the width of the plywood panel between the T-tracks. For a 24-inch-wide benchtop with 7/8-inch T-tracks, that would be 24 inches - 7/8 inch - 7/8 inch - 7 1/8 inch = 15¼ inches.
Lay out the T-tracks on your benchtop.
Mount the T-tracks to the benchtop boards. Use the narrow plywood benchtop panel to help space the T-tracks properly when installing the rear T-track.
Place the plywood benchtop panels carefully and fasten them down with glue, or use wood screws or nails.
At this point, you’re finished with your benchtop!
I highly recommend anchoring your bench to a wall, or multiple walls if it’s installed in a corner. This will provide a much more solid setup for your reloading presses compared to freestanding options—even when the legs are bolted to the floor.
Mounting T-Tracks
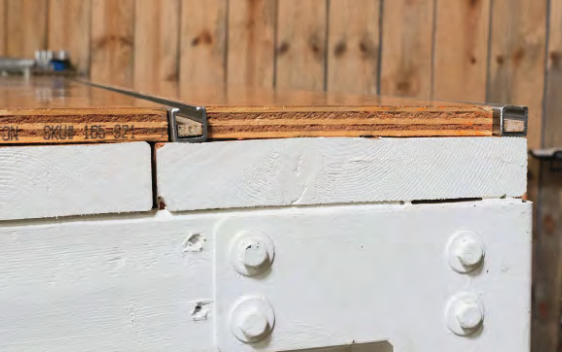
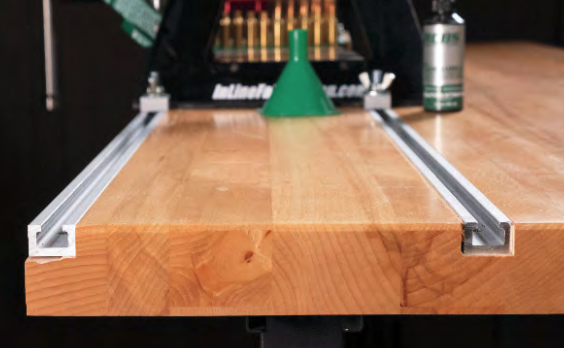
The easiest way to install T-tracks on the top of your bench is to screw them to the top of the table, then install plywood panels on either side of the “inboard” T-track.
You need to ensure the thickness of your chosen plywood is equal to or slightly less than the height of the T-tracks you’re going to install. Contact between tool-mounting plates (or the bottom sides of the tool) should be with the plywood top and the T-tracks or just the T-tracks. Be sure that your T-tracks are not lower than the top of the adjacent wood surface.
Embedding T-Tracks
If you have a bench with a solid wood top that’s about 1¾ inches or thicker, you can create channels in the top for mounting your T-tracks. This makes for a clean look and can work well with off-the-shelf “butcher block” or other solid wood tabletops.
You can use a table saw with a standard blade and make multiple cuts per channel, or use a dado blade on your table saw that will cut each channel in a single pass. Another way to cut the channel is with a wood router and a straight flute bit. You’ll need a straight edge and a steady hand to make this work without any waves or zigzags in your channel.
You can incorporate “drop zones” into your T-tracks for bolts in the middle of the bench or at specific intervals. This is accomplished by cutting away the “ears” at the top of the T-track so that you can drop bolts through the opening. You can use a large-diameter drill bit and drill or a milling machine to make these cuts. A simpler but less elegant way to incorporate drop zones is to leave gaps between adjacent sections of T-track where they butt up against each other. This enables you to swap out tools or presses without having to slide the bolts very far and prevents having to move other equipment to facilitate bolt access.
Mounting Tools
There are many ways to mount your tools using the Ultimate Reloader Bench System. These include making mounting plates, using existing holes (or slots) on the base of the tool being mounted, or drilling holes in tool base flanges. You can also use hold-down clamps that secure the tool base or flange directly without the need for holes or slots.
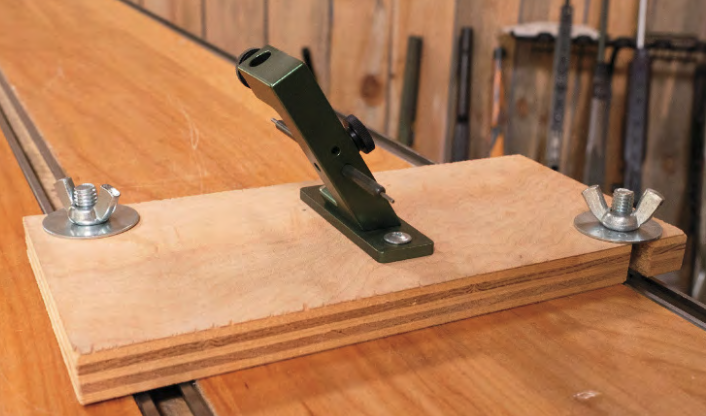
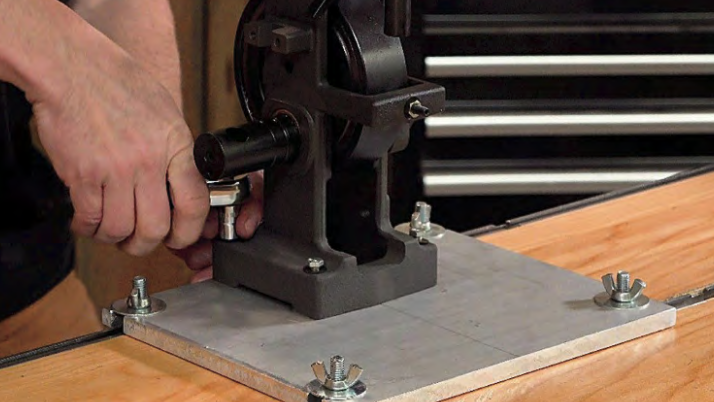
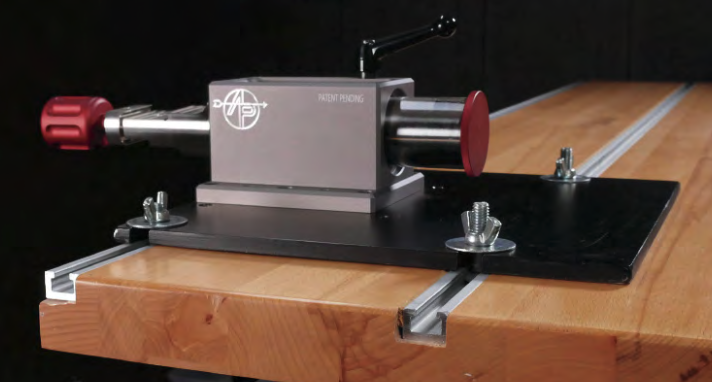
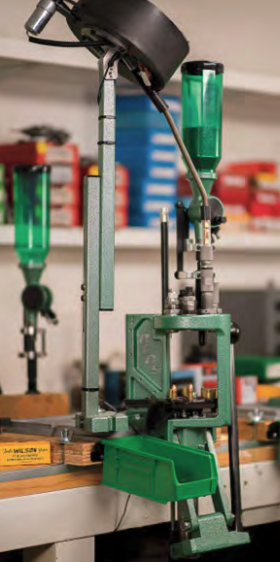
Mounting plates can be made from wood or metal. If you are making mounting plates from wood for reloading presses, I suggest doubling up 3/4-inch plywood and gluing the two plywood plates together. Drill holes for the side slots and cut out the slots with a jigsaw or similar. For mounting tools that don’t need to withstand much force, a single plywood plate with two or four mounting holes or slots is plenty adequate.
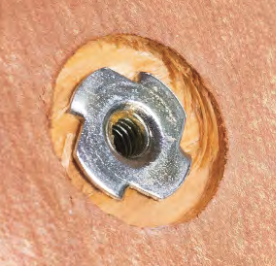
For wood mounting plates, I have used T-nuts (mounted from the underside) with a recess cut using a spade bit with great success. The press or other tool is bolted to the plate and engages with the blind nut in order to clamp the press to the plate.
Mounting plates can also be made from plate steel or aluminum, but this requires a bit more skill and specialized tooling. When I make metal press-mounting plates, I first cut the metal plate to size, then drill and tap mounting holes for bolts or studs. Finally, I mill side slots for the hold-down bolts using a milling machine.
Hold-Down Bolts and Clamps
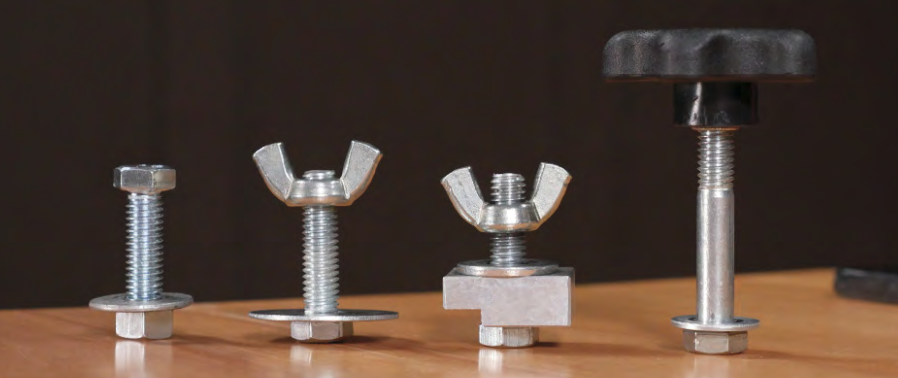
For press and other tool mounting, there are some great options for mounting hardware that act as interfaces between the tool and the bench. These include bolts, threaded knobs, washers, custom hold-down clamps, and off-the-shelf hold-down solutions.
The simplest and most cost-effective hardware is bolts with either wingnuts or threaded knobs and optional washers. Using this simple hardware, you’ll be able to secure your presses very effectively with wrenches (if using standard nuts) or by hand (if using knobs or wingnuts).
If you don’t have holes or slots in the base of the tool you need to secure, you can use a tab-type hold-down clamp (readily available online) or make something custom. At Ultimate Reloader, we frequently use custom-milled aluminum block hold-downs, which are great because of how quick and flexible these clamps are to use.
With some creativity, you may also be able to use bolts and washers alone to hold down tools, if the profile of the tool base is accommodating. Here at Ultimate Reloader, we have used our bench system for many things, including single-stage and turret presses, progressive presses, case processors, powder measures, priming tools, case inspection tools, precision measurement tools, bench vises, gunsmithing vises and fixtures, barrel vises, and more.
Building a modular reloading bench is an investment that will pay dividends for years to come. I hope you can experience the satisfaction of being able to repurpose and reconfigure your workspace easily and elegantly after implementing a system like the one described here. The Ultimate Reloader Bench System has saved me a tremendous amount of time and frustration, and I have gotten a lot more out of every square foot of my bench space. That’s a great feeling!
The Ultimate Reloader Bench System has saved me a tremendous amount of time and frustration, and I have gotten a lot more out of every square foot of my bench space.